The Upper Route Planner app makes it easier to complete your marketing visits by eliminating the need for printed lists or manually entering addresses.
Why Use This App?
-
Paperless Navigation: No need to print your lead list. Everything is organized within the app.
-
Effortless Routing: Addresses are pre-loaded—just tap to navigate, no manual entry needed.
-
Seamless Communication: Your Marketing Coordinator plans and prioritizes your route, and you can easily report important updates about each visit to the rest of the marketing team right from the app.
Big Picture: Community outreach is part of a larger marketing campaign that also includes social media, email outreach, and digital strategy. Your Marketing Coordinator helps coordinate these efforts.
To keep everything aligned and running smoothly, it’s essential that the app is used as intended—this ensures field updates sync effectively with the broader marketing plan.
Installation & Registration
Download the App
-
Search “Upper Route Planner” in the App Store.
-
Download the “Delivery Driver App by Upper.”

Sign In
-
Open the app and sign in using your phone number.

- Enter your Phone No. & click Continue

-
Enter the One-Time Password (OTP) sent via text.
- Tap Continue to complete registration.

App Configuration (First-Time Setup)
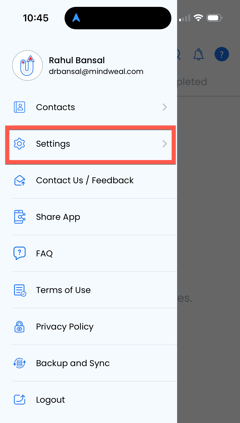
Access Settings
-
Tap the three horizontal lines in the upper-left corner.

- Click Settings
Configure Update Route Settings
-
Average time per stop: 20 minutes
-
Units: Miles
-
Optimize for: Fastest (Time)
-
Driving Preference: None
-
Vehicle Type: Car (auto-selected)
-
Curbside Delivery: Any side (auto-selected)
-
Default Navigation Map: Google Maps
(Make sure the Google Maps app is installed on your phone.) - Proof of Delivery Options: Click open to configer these settings

Proof of Delivery Settings
-
Turn off:
-
Signature of Recipient
-
Photo
-
-
Under Success Options, Swipe right and delete:
-
Delivered to another person
-
Delivered as per instructions
-
- Under failure Option, Swipe right and delete:
- Bad Weather
- Nobody to receive the delivery
- Click Save

- Below are the final Success and Failure options that should remain, as shown in the image

Configure rest of the Settings
-
Turn off Parcel Info Options
-
Tap Save

Location Tracking Info
-
The blue arrow icon at the top means the app is active and your location is being tracked.
-
Tracking only occurs while a route is active. Once the route is finished, your location is no longer tracked.

-
However, the blue arrow may stay visible even after you’ve finished. To remove it, close the app from the background (kill the app). Watch this video guide for help:
-
iPhone: https://youtu.be/chOn_6-rbwA
-
Android: https://youtu.be/IYI5zZA_Enc
-
To ensure accurate tracking during your shift:
-
Go to your phone’s Settings
-
Tap Apps > Upper Driver App
-
Under Permissions, set Location to:
→ “Allow only while using the app”
Using the App for Daily Routes
- Open the app and go to My Routes to view your assigned route.
- Tap the Route

- Click Start Route

- Tap Navigate to open Google Maps and begin your drive.
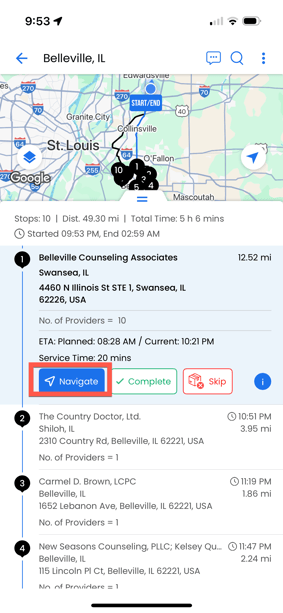
- After Visiting a Lead, Come back to the app, Tap Complete

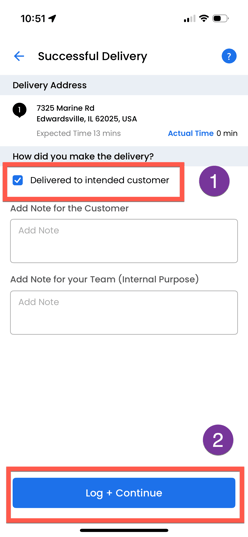
- Select how the delivery was made:
-
If delivered to a mailbox, choose: "Package delivered to mailbox."
-
If delivered to a business (including front desk drop-offs), select: "Delivered to Intended Customer.
-
IMPORTANT:
- If you delivered to a mailbox, please leave any important notes for the team here. You will not be filling out the Jotform in this case—this is your only place to leave a note.
- For all other successful deliveries, the Jotform must be completed.
TIP:
- If you entered a business to make the delivery, use the Jotform and include all delivery-related notes there.
- If you did not enter the business premises (e.g., delivery to mailbox or failed delivery), do not fill out the Jotform—just leave your notes here.

- Tap Log + Continue
- You’ll return to the route screen. Tap Navigate to proceed to the next stop.
Skipping a Stop
If you’re unable to visit a business:
- Tap Skip

- Select the reason (e.g., business closed)

IMPORTANT:
-
If you did not drive to the stop and did not attempt to deliver, select "Not enough time." This ensures miles are not counted.
-
If you did drive to the stop and attempted to deliver, but were unable to, select a different reason such as "Can't find the address" or "Other"—and briefly explain why the stop was skipped. This allows the miles to be counted.
- Add a short note for the team
- Tap Log + Continue

Ending Your Route
-
After completing your final stop, return to your final destination — either your home address or a MindWeal office.
Please note: the Navigate button for this final destination may not activate immediately after your last stop. If that happens, simply use your regular navigation app (e.g., Google Maps) to head back.
- Once you've arrived, open the Upper Route app again and tap Complete Route, as shown in the image below.


If you couldn’t visit all locations due to not enough time:
- Go to each unvisited stop
- Tap Skip > Not Enough Time > Log + Continue
- After all skipped, navigate to your final stop and tap Complete Route
Important: Always complete your route in the app the same day, even if you didn’t visit every stop. This ensures the Marketing Coordinator receives complete and accurate data.
Accessing Completed Route Information
After completing your route, you can review key details like stop logs and total distance traveled. To access this information:
- Go to the Completed section in the app.
- Find and tap on the route you just completed.

- Tap the three dots in the upper right corner (⋮), as shown in the image.
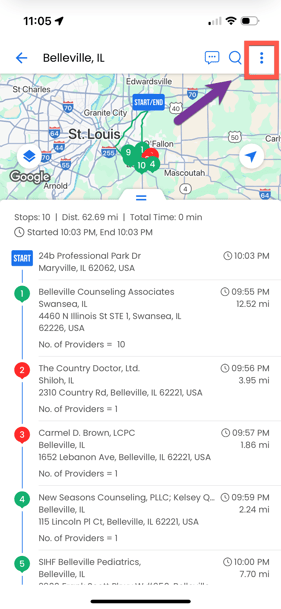
- Select View Stop Logs to see notes and outcomes for each stop.

- Here is a screenshot for a sample Stops logs

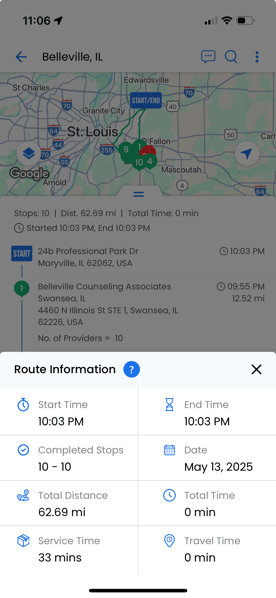
- Select Route Info to view details such as total distance traveled and overall route summary.

- See the screenshot for a sample Route Info
This shows the summary of the route including total miles traveled and other route details.
Reviewing this data helps ensure your travel is properly recorded and that you are reimbursed accurately.